Introduction
No matter what department you're in, paperwork can often be the bane of your day. You have to continually be signing your signature time and time again on different forms and contracts in business. Many of these contracts are probably ones you have seen a thousand times before, like employment contracts or maybe things like confirmed shipment forms; you know what's in them, and just want to get through them faster. Heck, you may have even had a hand in writing a few of them! Then your business finds an electronic signature provider, and that has to be faster than what you have been doing, right?
You would be right to assume so. An electronic signature is much much faster than traditional ink and paper. Still, you may be wondering, “how do I digitally sign on a PDF document?” or, more importantly, “how can I eSign a PDF multiple times?” and “Can I Copy and Paste an Electronic Signature to a PDF?” These are all very good questions, and ones we'll answer throughout this article. Below we'll go through a short ten-step guide for those who only need a quick explanation to briefly explain how to digitally sign a PDF document. However, don't worry if you don't understand; we'll go through much more detailed step by step directions on how to sign a PDF document later on in the article. Let us begin.
Let us take a quick look at how can you sign a PDF document with a digital signature
In this next section here, we'll go over a very quick step by step guide on how to sign a PDF document online with airSlate SignNow. Note, this short step by step guide will not only show you how to sign a PDF and send out but also how you would sign a PDF on a laptop or PC. Follow along with us as we get started.
- Go to www.airSlate SignNow.com and either sign in or register a new account if you don’t already have one. Go ahead and use your Google account if it’s easier.
- Upload a form, document, or PDF from whatever device you're using by clicking on Upload Documents. This will take a minute or so, so you'll have to wait for your file to upload onto your Homepage.
- Click on the document file’s name once you see that it has successfully appeared on your Homepage.
- Take a look at the left-hand-side tool panel and select the My Signature element and place it wherever you need it to be. Your eSignature will be applied where the element sits.
- Self sign the document. To generate your own signature you just click on the element you just placed down and start typing, drawing, or you could even upload an image of your handwritten signature if you want to. With this you can Copy and Paste an Electronic Signature to a PDF in airSlate SignNow as much as you need to.
- Click Sign and drag the executed element by using the move button.
- Drag and drop the Signature field on the left-hand tool panel and place the element wherever you need your client to eSign.
- Click the Save and Close button to get back to your Homepage.
- Click on the More button next to your file’s name and then on Email a Copy.
- Add a recipient and/or client email(s), include your subject and a message, then click Send Now and you're done. Just got to wait for them to sign it.
In just ten steps, you learned how to do pretty much anything you would need to know how to do when it comes to how to sign a PDF on pc with airSlate SignNow. This is one of the best reasons that we think airSlate SignNow is one of the most comprehensive, quick, and easy eSignature programs on the market. It even has the added benefit that your clients don't even have to have an airSlate SignNow account to be able to eSign the documents that you send them. All they have to do is have a functioning email address and an internet connection. However, if you still have a hard time, don't worry; as we said, we'll be going over a much more detailed explanation of how to digitally sign a PDF document and copy and paste your signature in airSlate SignNow later on.
If you're wanting to learn more about how airSlate SignNow works, and more importantly, how to sign, copy, and paste your signature multiple ways in airSlate SignNow, continue reading. First, however, we're going to take a look at a problem that many people seem to run into when working with electronic signatures. There are two very similar, yet distinctly different technologies that are often confused for one another; these are Electronic Signatures and Signature Stamps.
Types of signatures
Problems are arising all the time, which means that there will always be people trying to find the best way to solve these problems; in most cases, more than one person is trying. So at times, people will come out with very similar solutions to solve the same problem. In the case of signing contracts and overall giving your consent over the internet, this very thing happened. These two solutions are Electronic signature and Signature stamps. Let us take a look at them and see what makes each of these solutions unique.
What is an electronic signature
So the first one we're going to look at is the electronic signature. To define an electronic signature, or eSignature, “refers to data in electronic form, which is logically associated with other data in electronic form and which is used by the signatory to sign.” Okay, we now know how it's defined, but what does that really mean? It means that an electronic signature is essentially the same thing as a wet ink and paper signature. However, it has one glaring issue, and it does not in and of itself authenticate who actually signed the document. Many companies use authentication processes such as passwords, SMS verifications, or even call authentications to combat this. So let us see about signature stamps.
What is a signature stamp
A signature stamp, or commonly referred to as a digital signature, is defined as a mathematical scheme for verifying the authenticity of digital messages or documents. To the average person, that makes absolutely no sense, so we'll do our best to break it down. This definition means that there’s a mathematical code that is your digital signature, that is randomly generated to a person or company. Each time something is signed, two more codes are generated, and these are called keys. Keys are like passwords and have to be assigned by a Trust Service Provider. When the mathematical code and these two keys are unchanged, the document is secure and legally binding. If the keys are different, it means that the contract has been tampered with. This ensures extreme security.
So now that we have hopefully cleared up some potential confusion, let us get back to the questions at hand and how airSlate SignNow helps.
Editing a document with airSlate SignNow
As we promised at the beginning of the article we're now at the much more detailed step by step guide on how to sign a PDF document online with airSlate SignNow. Pay attention, for the information that we'll be going over is going to be very comprehensive, so that you and even your team will be able to know How to Copy and Paste an Electronic Signature to a PDF on any device you may have.
Step 1. How to edit a PDF so you can sign it
We’re now going to go over how to edit a file document so that you can sign it. However, before we can even hope to do that we have to upload a document to work with. To do this you'll have to bring your cursor to your airSlate SignNow Homepage. In the airSlate SignNow Homepage, you'll find an option that reads Start Uploading Documents Now. It’ll be in the center of your screen regardless of what device you're using, once you click on it and follow the basic prompts to choose what form of document to upload, you just have to wait.
Note: You can also start this process by pressing on the Upload Documents button on the top of your screen.

While your document is uploading, you'll notice a small popup notification at the bottom right of your screen. This is nothing to worry about, it's just a notification that is informing you that you have started to upload a document.
After the little notification at the bottom of your screen informs you that your document is uploaded and ready to go, you’ll need to look back to your airSlate SignNow Homepage. From your Homepage, you’ll need to look at the small column to the left of your screen and select the first option that says Documents. This is your Documents Folder. In this folder is where you’ll find the document that you just uploaded for editing.
Step 2. Applying client signature fields

Now that the first step of the editing process is complete we need take the next step which is adding Signature Fields to the document. Before that the first thing we need to do is open your document. To do this all you have to do is find the document’s name that you just uploaded and click on it. This will open up the document for editing.

You’ll notice that when you clicked on the document it took you to a new screen, this is airSlate SignNow’s document editor.
The first thing you'll need to look at is the column on the left hand side of the screen. This is where all the tools you'll be using to edit and digitally sign a PDF document will be located. There are quite a lot of them but for now we need you to focus on the option that says Signature Field.

The Signature Field option is as I am sure you can infer how your clients and signers will be eSigning your document. To add a signature field is simple and intuitive. All you have to do is click on the Signature Field option, then take your cursor to the page and location you want your singers to sign the document. Once the field is placed you have a small box that can be moved around and resized, this is called an element. If you don't like where the signature element is placed, you can use the move button (the move button is the four-sided arrow on the element) to move the element anywhere. You'll also notice that there are orange lines that will appear if you do decide to move the element. These lines are part of the airSlate SignNow alignment function that assist you in placing the element in your desired location. Don't be afraid to use this function to place the signature where you think it looks best, after all, it's your contract.
Note: This is not all that the Signature Field can do. If you need someone to sign on more than one page, you can place the signature element down multiple times. airSlate SignNow allows each signer to sign in multiple places on the same document. To add more than one signer, you'll have to click on the signature field element and use the Role function on the right hand side of the screen.
Step 3. Don’t forget the date
Now that your clients or signers have a place to sign there another important tool that we'll need to look at. You’ll use this tool almost every time you set up a form to be filled for you have to ensure that the document is properly dated. If you can direct your attention back to the left hand column you’ll find an option that says Date/Time Field. This field is most commonly used to document when a form or contract was signed by a signer. To add a Date/Time Field element is much the same as a Signature Field element. All you have to do is click on the Date/Time Field option on the left hand side, take your mouse cursor and place the element in the desired location.

Note: Remember the elements all work the same, if you don't like where it was placed, you can always use the move button to put it where you would most like it to be. It’s also important to say, is that if you have multiple signes you can add dates to each signer using the Role button when clicking on the date element. Remember to match names and colors to ensure it's formatted right!
Step 4. How do you electronically sign a PDF document
This is the step you all have been really wanting to see. Here we'll learn how to sign a document. Thankfully it's really easy and very intuitive to be able to learn how to set it up so you can sign a PDF.

In the left hand column, we need to head down to the bottom of the page. In this area of the column, you’ll find a section that is titled Edit & Sign. This section is completely made for you to be able to interact with your document. Under Edit & Sign, you’ll find an option that says My Signature, and as you can imagine is how you’ll sign your document. You need to click on My Signature to produce an element. Now that you have the element ready, you’ll go to the location on the document that you wish to place your signature and click, just like you did with the Signature Field element.
Note: just like all the elements such as the signature field and the Date/Time field, if you don't like the placement of the my signature element, you can use the move button on the element to place it where you would like it to be. Just remember to use the airSlate SignNow alignment function we talked about (the orange lines) to help make sure you get the element right where you want it.

With the element placed where you want it to be you now need to click on it. Once you do, you'll have a new pop-up window, this window is called the signature window. You’ll notice that you’ll have three options, The first is the Write Your Signature (Signature and Initials fields), the Draw Your Signature option, and the Upload Your Signature option. So let us break into these options so that you can fully understand what you need to do for each, and which is the best for you.
- Write Your Signature: The Write Your Signature option is where you’ll type out your signature in the available space provided, under the word “Signature”. When you do type out your signature, your initials will auto populate in the space under the word “Initials”. If you don't like how the signature looks, fear not, if you select the option that says Change Style, you can pick a font from the available options that fits your fancy.
- Draw Your Signature: The Draw Your Signature option is where you’ll draw out your signature on a touch screen (if the option is available to you). First you’ll select the Draw Your Signature option on the screen and it'll take you to another pop up where you can draw your signature. Now this is pretty simple, if you have a touch screen device all you need to do is trace your finger along the surface and you're done. However, you also have the option to use a mouse and pad to draw yourself a signature. If you're doing this option, you simply click and hold down the cursor and trace out a signature. This option may be a bit harder for some people, so don't fret if it does not look right, you can redo it as many times as you need.
- Upload Your Signature: The Upload Your Signature option is a bit different. If you want to do this option, you'll need to hop off the computer or switch out of the app for a moment. To do this you’ll need to find a nice pen and a clean sheet of paper and draw out your signature the old fashioned way. It does not have to be perfect, just draw it how you normally would when you sign something. Now you're going to have to take a picture of the signature with either a smartphone/Tablet, or you can use a camera. If you use a smartphone, you’ll connect it to your computer using a charging cable and transfer the picture you just took over to the computer/ laptop. If you're using a camera, you’ll need to place the SD card into the proper data transfer device and move the picture over to the laptop. Once that is done you can upload your handwritten signature to use on electronic signature contracts.

Fantastic! We’re almost done, but we still have some more to talk about before we're finished. We still need to talk about how you can copy and paste your electronic signature in airSlate SignNow. So we're going to use an example. So, in our little display we’ll pretend to be a man named Robert Frost.

So here we can see that Mr. Robert Frost has signed the document in the first company signature location, but as you can see he still needs to sign the document four more times. Thankfully for our friend Mr Robert Frost, it’s incredibly easy to copy and paste his electronic signature in the rest of this PDF.
The next thing Mr. Frost needs to do is go back to the left column and select the My Signature option once again. Now that the option is selected and the element can be used he simply needs to go to the other four locations he needs to sign, and place the elements down where he needs them. As before he can adjust them to his desired spot if needed.
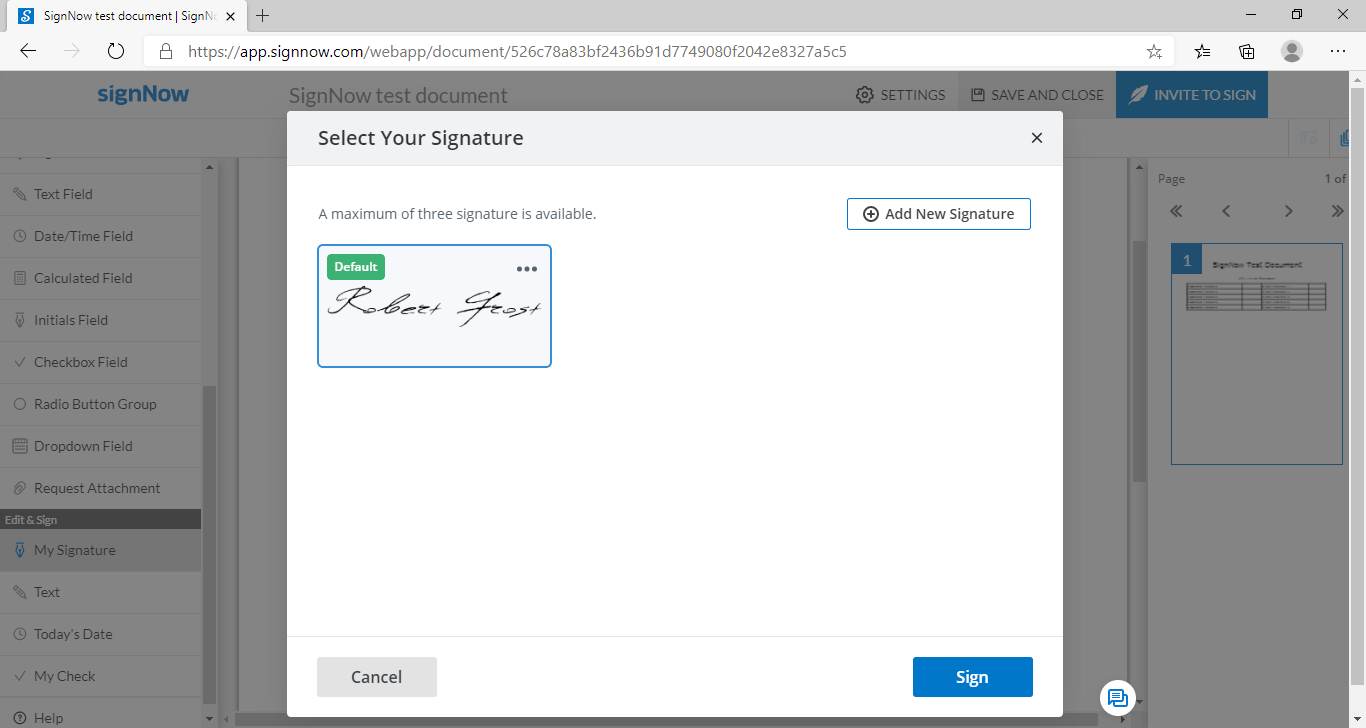
Now, when you try to place another signature, you’ll find the screen above will appear on your screen. This screen is quite great because it shows you that airSlate SignNow has remembered your signature. It does not matter if you did a manual sign to sign the PDF, if you used touch signing to sign the PDF, or if you used the type your signature to sign, it'll remember it.

This is incredibly useful because by using this function you can virtually copy and paste your electronic signature as many times as you need in your document. As you can see Mr. Rober Frost has signed all the locations he needed to on this file. It’s really that easy to sign and then copy and paste your signature in airSlate SignNow, it does not matter if you're using a laptop to eSign, you're using a pc/computer to eSign, a smart phone, or even a tablet, it’s all really simple.
As simple as signing a contract you make may seem, you may still be worried about how you sign a contract that is sent to you. This is a valid concern, and thankfully is just as easy, if not easier than electronically signing a pdf you make. So let us head to the next section and see how it's done.
How to sign and send back a PDF
So you're no longer the one sending a document, you're the one receiving a file to sign. In this instance you may be wondering “how to sign and email back a pdf?” and that is not a bad question. Good news is that it's incredibly easy to do.

So you have been sent an email that you have to sign. The first thing you need to do is open up the email and see that you have been invited to sign a document. When you see that you have been invited to sign some type of file all you need to do is find the option that says Sign Document and click on the prompt. Once you do, you'll be redirected to another page where you’ll sign the document. Now it's important to note that it's possible that the one who sent you the document was worried about who could sign. This means that you’ll be required to verify who you are before you can sign the document, there are a couple of things they could have set up as precautions.
- Password: it's possible that they set it up so that you would have to input a password before you can continue. If they did this, you’ll need to contact them for what the password is before you can move forward with signing. This is as simple as giving them a call or perhaps it was sent in an earlier email.
- SMS Message: it's also possible to have contracts require an SMS text message security feature in place. If this is the case, you’ll simply have to initiate the process by following the prompts provided.
- Security Call Authentication: This security measure is very similar to the SMS message security feature. If you're met with this authentication method you simply need to initiate the process by following the prompts provided.
Once you're verified by whatever means you may have been required to go through you’ll be met with this message above. Once here you just need to click on the Get Started button in blue.

Now that you’ve gotten started, you’ll need to click on the highlighted elements. (the highlighted ones are the only ones you can sign/fill) Once you have done that, you’ll be given the option to sign the document, you can do this the same way you can sign a document that you create. Once you have done that you need to press the Next button. When you do press the Next button the rest of the fields will start to auto fill. After that, you’ll be left with the last element that will be the date. To fill this field you’ll need to click on the Today’s Date option. Although you do have the option to put in any date that you need to. After that all you have to do is select your desired signature type.

Once that is done, all you have to do is press Done on your screen's top right. Then, you’ll be greeted by the message, “Thanks! You’ve successfully signed the document. The originator will be notified.” From there, all you have to do is close your email or application. And that is it! That is how to sign a pdf document from email.
So in the end it's no that bad learning about how to eSign inside a PDF
Dealing with modern day business requires you to be able to know how to do a lot of different things. One of these things is being able to sign contracts, and thankfully, it's so much easier and faster with programs like airSlate SignNow. In as little as ten steps you were able to learn how to do just about everything you would normally need to be able to do. If you stayed with us and read all the way through to the end, you’ve taken a big leap forward when it comes to knowing how to handle the changes modern business has taken on.
Join the millions of daily users (large companies that you’ve probably heard of) who’ve already said yes to airSlate SignNow in their battle to eliminate paper-based bottlenecks from their business processes. These companies include, but aren’t limited to powerhouses like AGMEN, CBS Sports, GoFundMe, Xerox, et., the list goes on and on.
We hope you got something valuable from reading this article; thank you for sticking with us till the end. If you have more questions, please visit our Questions & Answers section. There, you’ll find many more step-by-step instructions for working in airSlate SignNow.